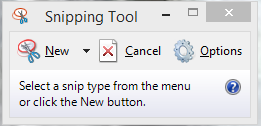
There are many times when I want to save a part of my computer screen, whether it be an error message or something I found online that I need to save for later. The main way I had done this in the past was to tap the print screen button (prt sc) on the keyboard. This sometimes has to be fn and another key depending on the keyboard. And that way still works, but if you only want to save a smaller part of your screen, you would need to take the screen capture, paste into a document of some kind and then crop it. With the built in Snipping Tool, you can capture just what you need and save directly as a jpg (picture). The easiest way to find it is click start and in windows 7 start typing snipping tool in the search box, in windows 8.1 click the start button and then just start typing to search. When you open it you will get a little box like pictured below.
There are a few options with the snipping tool. You can do it 4 different ways, free form, rectangle, window, and full screen. When using each the selection type is the difference. If you use the free form you can select what you want to capture in any shape (that you can draw with a mouse). Using the rectangular method, the capture will have straight edges in a rectangle. This is the one I use the most. Window, will take a capture of the active window. To use this one you will need to open the tool select the window you want to capture then click new and then window snip. The last is full screen capture which captures everything visible on the screen(s).
Once the capture has been made it opens in a new window and you have options for saving it. You can save as a file, copy (for pasting), or send in email. When you close this window you will notice that the Snipping Tool has closed automatically. If you use the tool a lot, to make it handy I suggest pinning it to the task bar/start menu so you don’t have to search for it.
